


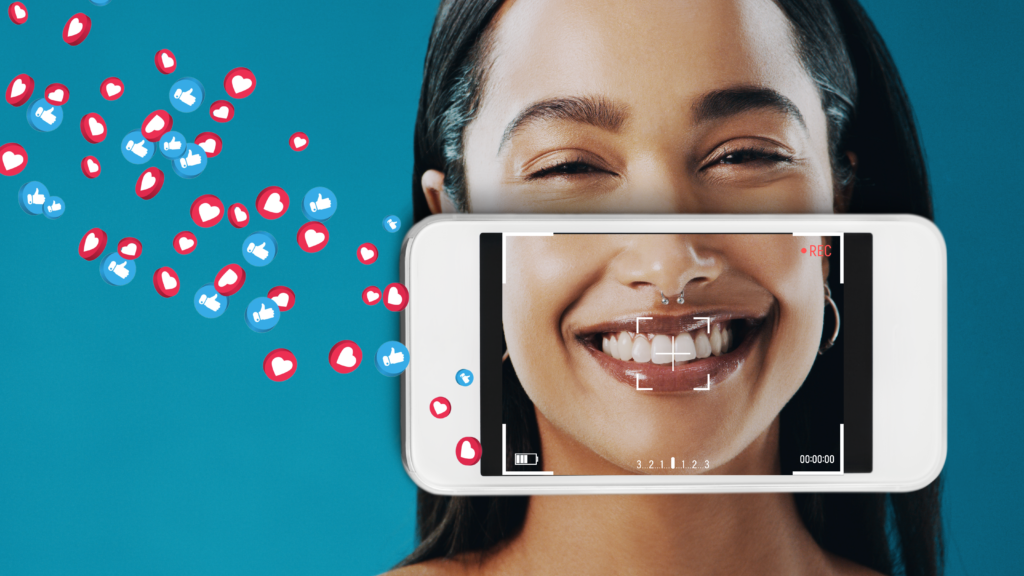
The Perfect Clinical Photography for Social Media
Taken with your smartphone, not a photography camera
” – Hi there, I am a new patient wanting to book an appointment at your clinic. Would you mind sending me your Instagram page so I can look at your work, please?
– We don’t have Instagram I’m afraid!
– Ok, what about Facebook?
– No Facebook either.
– Ummm… ok. I’ll call you back. Thanks! (phone disconnected) “
It’s no secret that the rise of social media has changed social and professional dynamics as well as human interaction over the past couple of decades. With it came a sense of validation that people and businesses weren’t used to before.
The truth is that nowadays, success is portrayed online and if your clients can’t ‘verify your existence’ through likes of Instagram, Facebook or TikTok, they’re likely to skip over and look for another provider. And these are facts:
“36% of online bookings come through Instagram, 22% through Facebook, (BookedIn, 2019)”
“41% of booking services are found through social media, 29% are direct, 25% through referral websites and 4.4% via organic search. (BookedIn, 2019)”
What does having a social media presence mean?
To put it simply, it means having a website alongside an active and engaging presence on the most popular and relevant social media channels such as Facebook, Instagram and/or TikTok.
We know what you’re thinking! Keeping your viewers and potential new patients engaged and entertained in the dental business isn’t an easy task. We couldn’t agree more. The only way to engage without having to be on your phone a large amount of time is by showcasing what you do on a daily basis. That’s right – we’re talking about taking pictures of your work, arranging them into a harmonious design that aligns with your brand guidelines and posting it on your social media profiles.
This now brings us to the main subject of this blog: how to take beautiful, scroll-stopping dental pictures.
Looking into people’s mouth isn’t amongst anyone’s top-rated things to do except dentists. And seeing as your main target should be patients, we’re here to walk you through the do’s & don’t’s and teach you a few tricks on how to take the best dental pictures and how to put them together into an attractive ‘before & after’ design.
How does photography work?
It’s important to understand why a picture will never show 100% reality. It is because what you see on your phone screen has been captured and processed by the phone camera (not by you).
The sensors of your phone camera captures meta-data (signals of light). The signals get sent to the processors of your device and they get converted into a RAW-file (unedited, raw material) which then gets compressed and exported into a format chosen by your device (most often JPG or PNG). When this happens, all the parameters of your camera (brightness, exposure, highlights, shadows, contrast, saturation, etc.) get adjusted to a level which can be displayed on your device in a pleasant manner.
HOWEVER: this means that because you are not the one who decides the parameters of the photo, the standard settings that the engineers of your device have designed for everyday pictures will be applied to every single one of your photos automatically. As the environment (therefore the lights, the shades, the colours) are different each time you take a picture, they always end up looking slightly different. This is something less than ideal in clinical photography for teeth whitening because that is when confusion appears, and patients and viewers can say you either photoshopped the pictures or that it’s not the same patient in the before as in the after.
In order to maintain consistency in all your photos as much as possible, you will need to manually adjust all the parameters mentioned (brightness, white balance, sharpness, exposure, highlights, shadows, contrast, saturation, etc, etc, etc). Some mobile phones have that options already integrated within the camera, but others do not (interestingly enough, iPhones do not have it). In that case, you can use a ProCamera application such as:
- Pro Camera by Moment
- ProCam 8
- ProCamera. Pro iPhone Camera
- ProCam – Manual Control Camera (it’s not the best but it’s free)
- Focos
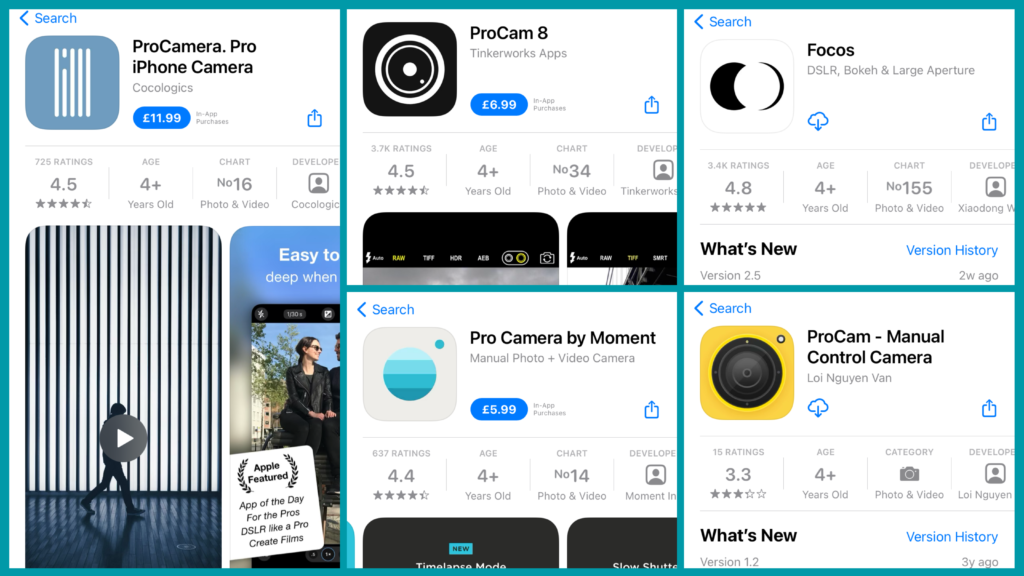
It’s a small investment, but it’s totally worth it: you pay £6 – £10 once and you have it for life.
This is why professional photographers always use RAW photos, because they want the freedom to decide what the parameters of the photos should be used.
There are a few things that you’ll need and you must keep in mind when you’re taking clinical pictures:
- Lighting (surgery light, additional light)
- Manual Settings (white balance mainly)
- Angles, Ratios and Positions (hoping we don’t have to explain this😅)
- Focus Object (teeth only, lips included, full mouths, lower face, full face, etc)
- External Factors (nurse’s hands, intra-oral mirrors, retractors, shade guides)
LIGHTING
This is the key factor for a good picture. The lighting must be consistent in order to always capture good photographs. You should avoid taking pictures of the same patient in different surgeries or different spots.
If you decide on additional lighting, you must make sure it isn’t harsh (like a direct flash) as it causes weirdly bright pictures and can also cause shadows, which you’ll have a hard time removing. You can use something that disperses light (cheapest thing is a piece of baking paper stuck over the light).
MANUAL SETTINGS
Based on what we talked about in the previous category, the white balance is the most important setting you should look at getting spot-on.
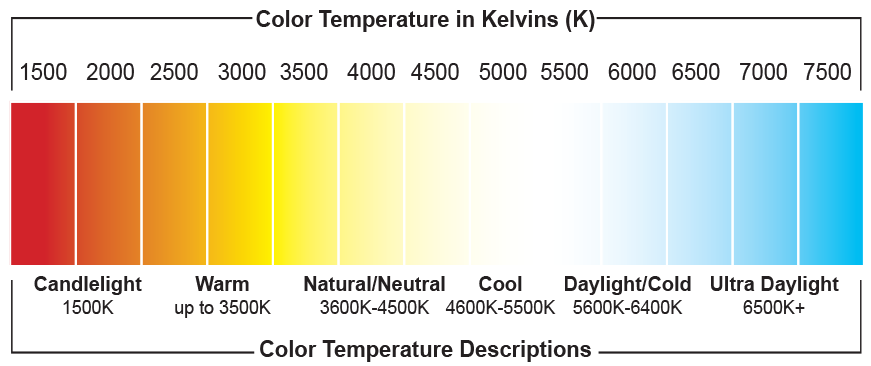
White balance is a setting that adjusts the colour balance of the light you’re shooting in, so that it appears a neutral white. It is used to counteract the yellow-toned artificial ‘warm’ lights, or the cold light of a picture taken under a very blue sky.
Please observe how 3 pictures taken one after the other but with very different level of white balance can look drastically different.
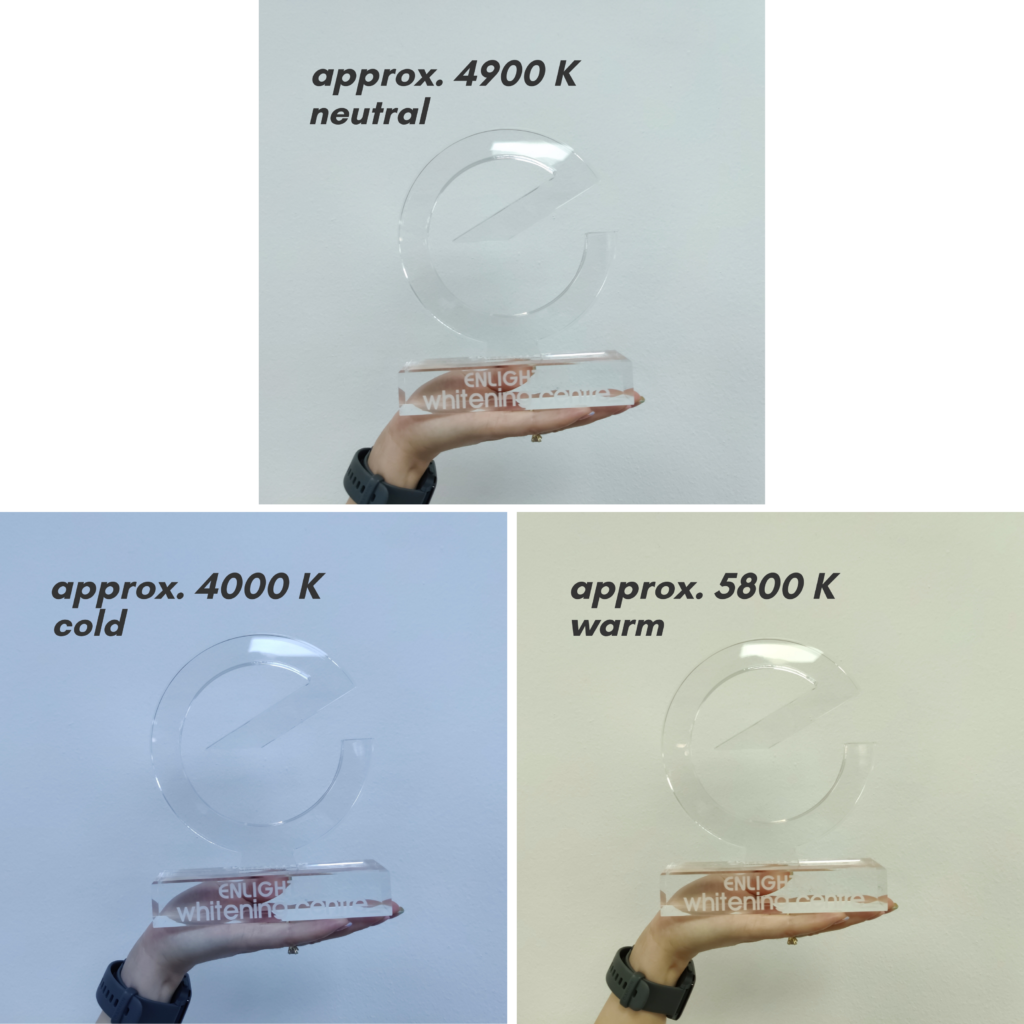
PLEASE NOTE THAT THESE ARE EXAMPLES BASED ON OUR OFFICE LIGHT, THE NUMBERS OF YOUR SURGERY WILL NOT BE THE SAME.
And here is a representation of the same concept in a video:
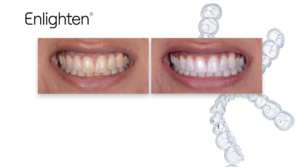
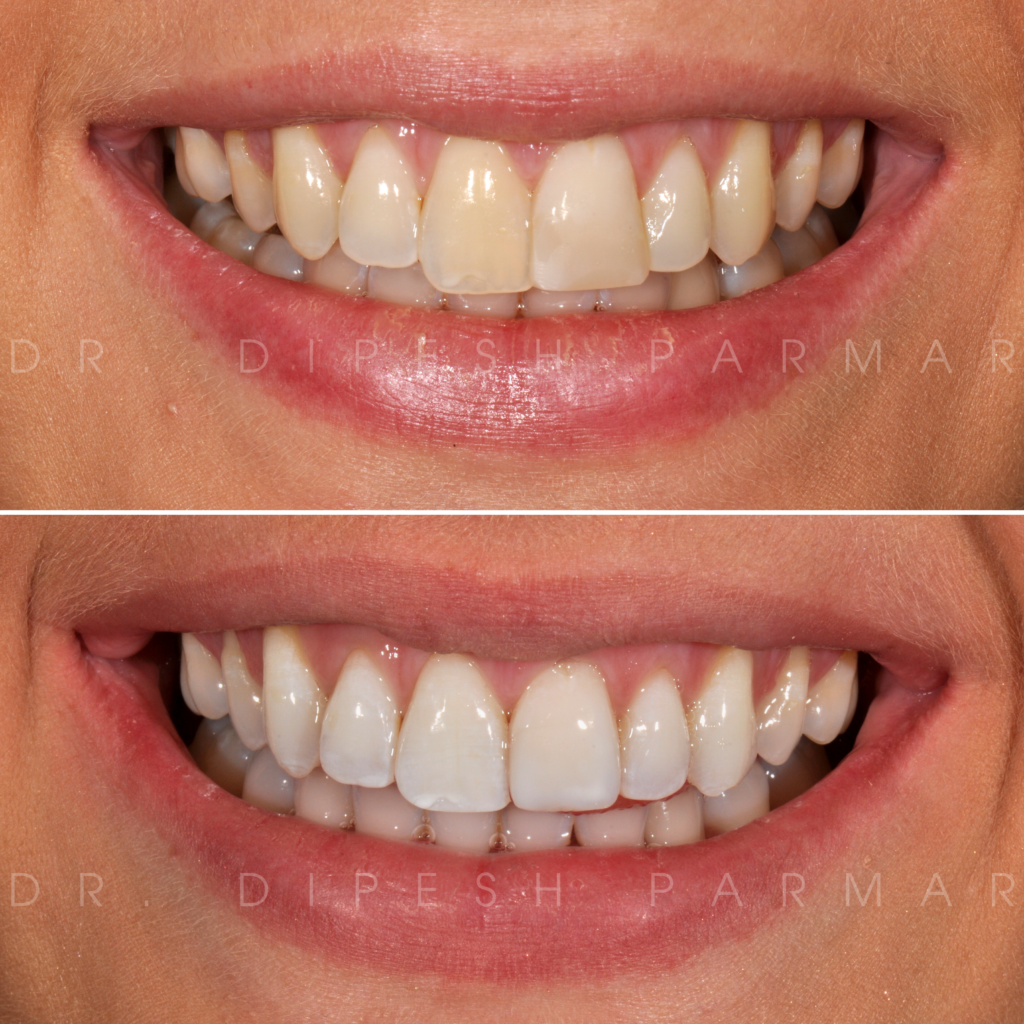
Considering that in teeth whitening photography you want the difference between the before and after pictures to be quite obvious, you must make sure you aim for a neutral light to offer your viewers the most accurate representation of the true shade.
To find out how to counteract your surgery light, open the ProCamera app you downloaded, find the white balance setting, hold it up and move it around (in the camera mode of course, as if you were about to take a picture of the surgery), and see what WB number (measured in degrees Kelvin ‘K’) shows up. Here are a couple of different charts we found online to help as a guidance for degrees Kelvin you should be looking out for. Once you determined what type of light you have, every time you take a photo of your patient’s mouth, make sure to adjust the setting to a neutral number, and write it in your patients notes to make sure you use the exact same settings next time.
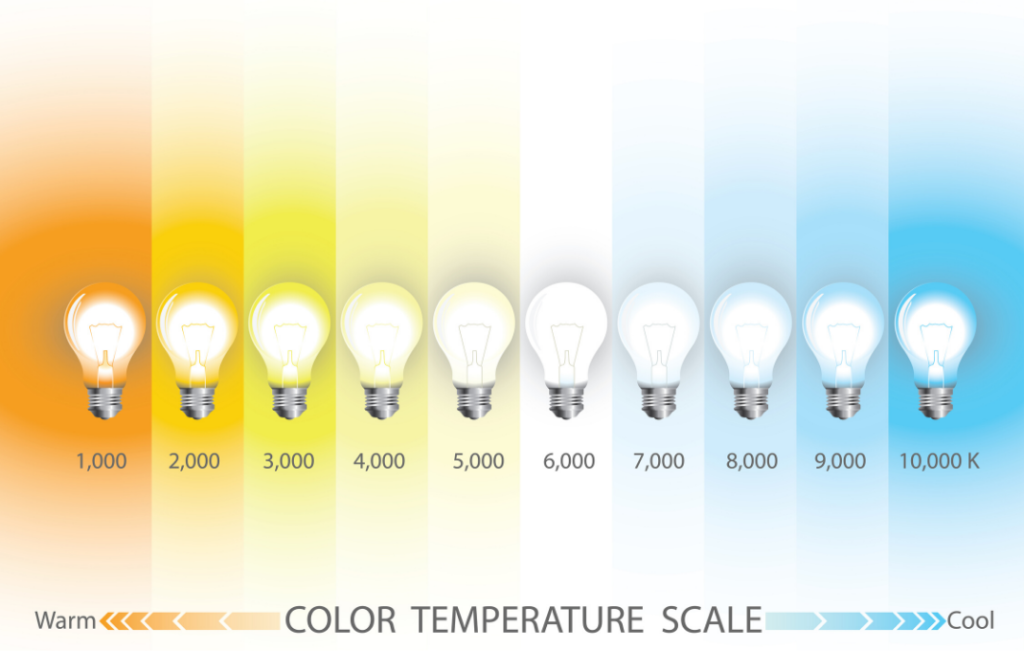
(https://www.prolighting.com/blog/2020/06/16/choosing-the-right-color-temperature-for-your-home/)
https://www.eledlights.com/blog/post/a-quick-guide-to-lighting-color-temperature/
CONSISTENCY IS KEY. Make sure that the colour of your patient’s skin is the same one in both pictures. if they are not, edit them! Editing them at this stage isn’t cheating, but the opposite.
ANGLES/RATIOS/POSITIONS & FOCUS OBJECT
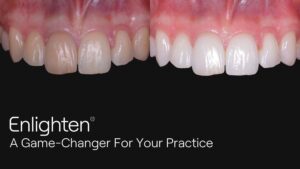
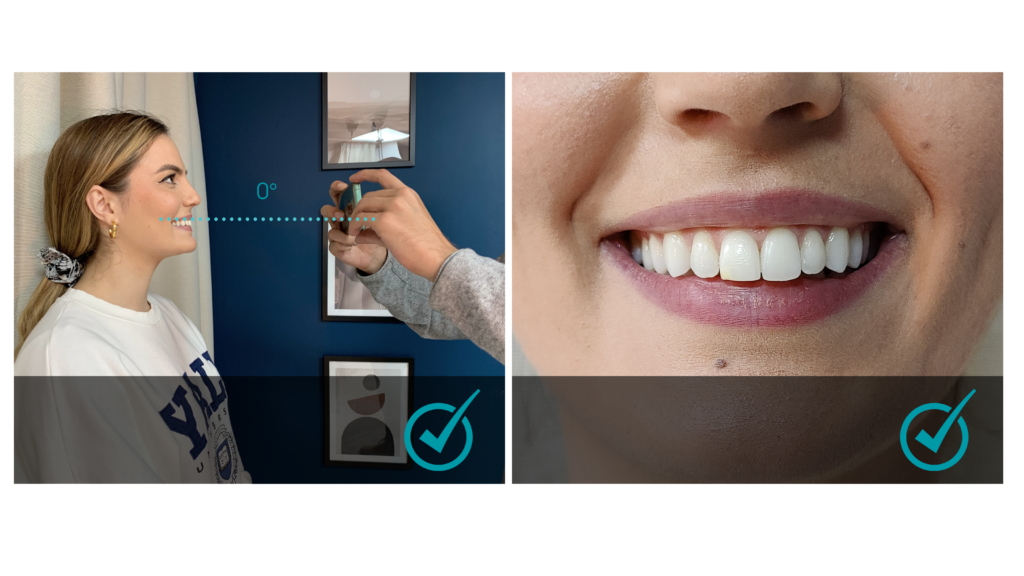
In order to take the cleanest before and after pictures for social media, you must make sure that your pictures are taken from the same point of reference every single time. This point of reference should be a straight horizontal line perpendicular with the patient’s mouth. The line between your camera and the patients mouth should be at 0° as per image below.
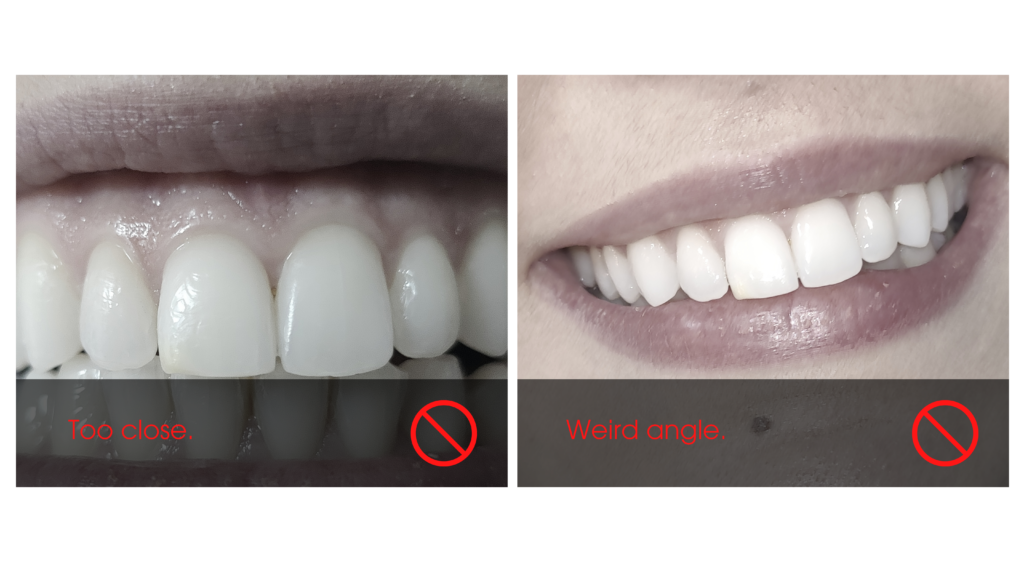
 Avoid taking pictures at different angles, whether it’s below or from above.
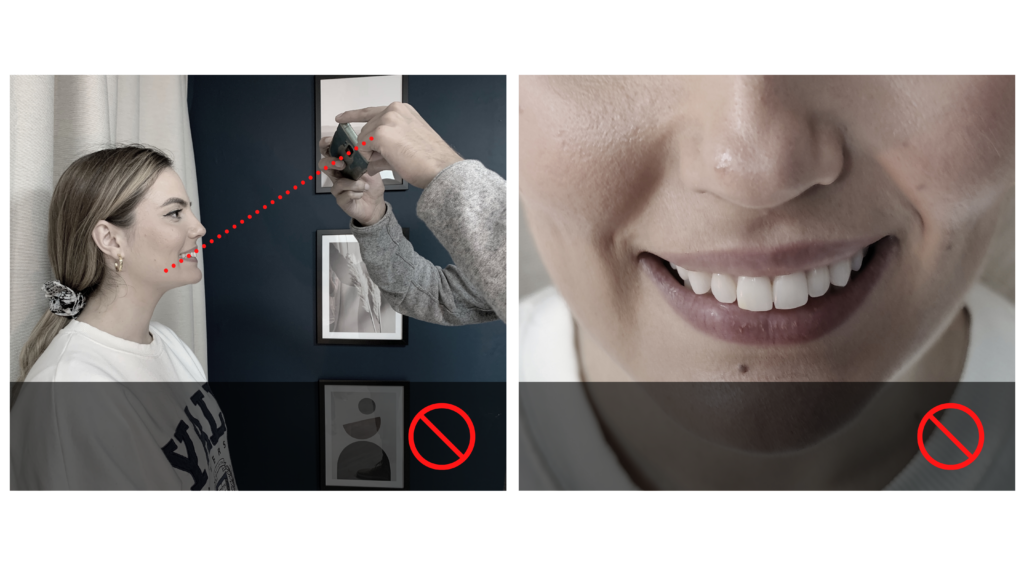 Avoid using photos that are not centred, symmetrical taken from the sides, too close-up or blurred.
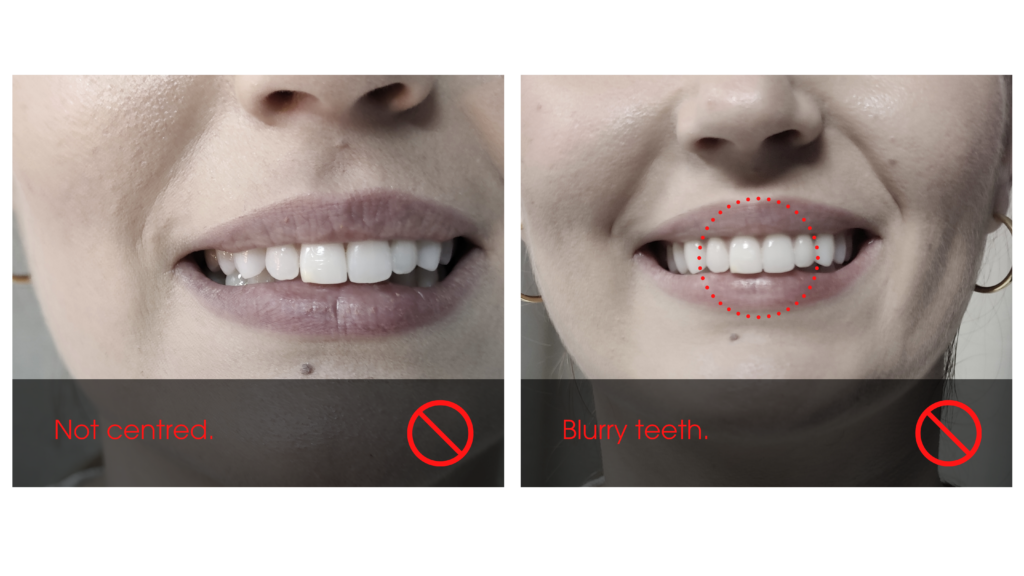
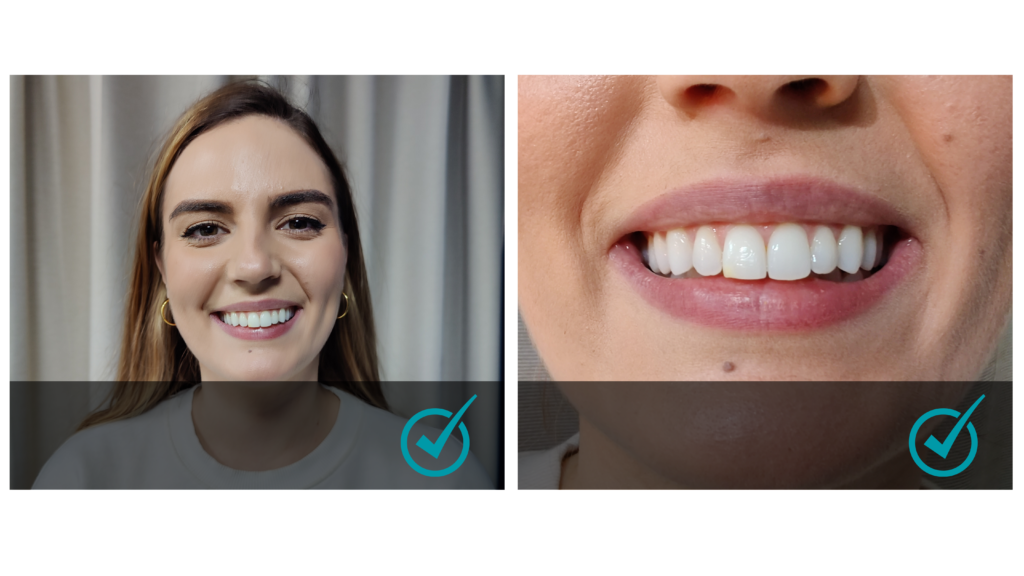
Instead, keep it clean. Centred, show the face if you have consent, otherwise try to catch the whole mouth in the picture.
 EXTERNAL
Not much to say here except the fact that those like us who are in the dental industry are used to not only looking at teeth pictures all day long but looking in actual mouths. But that does not mean that everyone feels the same about it. No one wants to see cheek retractors, intra oral mirrors, the nurse’s hands holding retractors, or worst – retracting the lips! We do not deny the need for cheek & lips retractors in actual clinical photography for record keeping or self-reflection purposes, but not for social media!
Keep the pictures as clean and visually pleasant as possible by just asking the patient to pull a lovely wide smile and that is it. In the very rare case where patient has a very low upper lip line, then ask them for an exaggerated smile, but it’s still best to stay away from retractors.
AND FINALLY!
To summarise it all, the easiest way to do a consistently good job with a phone camera, is to follow these steps religiously:
- Pick a spot in your surgery which is going to be your photography spot. It must have good lighting, plain background (neutral colours thought – black, white, grey nude).
- Take photos with the same device every time, particularly with the same patient.
- Turn on the same lights each time, don’t play with them too much.
- Use the same white balance manual settings as we showed you in this blog.
- Stay away from intra-oral devices (cheek retractors, intra-oral cameras or intra-oral mirrors)
- Always check for symmetry.
› DIG DEEPER ‹
![]()
» eBooks
Read up on the 6 tips that will perfect your anterior resin restorations here.
And to discover how you can achieve the aesthetic results you want when doing a single veneer with a single shade of composite, click here.
» Websites
If you want to learn more about the 2-day hands-on anterior composite masterclass with Dr Dipesh Parmar, click here.
![]()
» Training
To become an Enlighten Whitening Expert and get CPD certified for free hit the button below to take our hour-long online training.
» eBooks
Learn how to dramatically increase the number of whitening treatments you do here.
» Websites
Or if you’re interested in knowing more about the Enlighten Teeth Whitening System, then give it a click right here.
» Podcast
Learn how to emulate the success of the movers and shakers in the dental industry from their own mouths, featuring the nuggets of knowledge from likes of Simon Chard, Andrew Moore, Tif Qureshi, Mark Hughes and many more.